Everyone is talking about Internet of Things (IoT), but hardly anybody is talking about “how to set it up”. I will show you how to do so using detailed step-by-step instructions. Let's start with a simple example: Imagine you run a company that maintains oil-pipelines. Thousands of miles of pipelines. Before IoT you had random checks on these pipelines but probably most of the times discovered leaks when oil appeared on the surface. To repair the leak you had to dig up huge areas because you had just a daring idea where the leak might be.
With IoT you use sensors to prevent leaks and environmental pollution. Temperature sensors, pressure sensors and so on, telling you about the condition of your pipeline.
Why MQTT and how does it work?
Having electric mains power and ethernet all over the pipeline is due to obvious reasons not feasible. So you have to rely on a radio link, something like LPWAN or a satellite link and the sensors are driven by small embedded devices which are e.g. solar-powered.
That all leads to MQTT: Data packets are small and implementation is lightweight. Both saves energy and computing power and enables you to have - lets say - a sensor every kilometer. . This quickly adds up to thousands of sensors.
Low-level protocols are out of question, since translation between system and application level causes most of the programming effort. Fortunately, there are many application-oriented alternatives. One of these is MQTT.
MQTT once stood for MQ Telemetry Transport and nowadays defines an OASIS- resp. ISO Standard (ISO/IEC PRF 20922). It's a lightweight publish/subscribe solution: Clients can publish messages into topics, which can be read by other clients who subscribed to those topics. Due to it's very simple protocol, it's easy to implement, even on a very tiny/low-end 8-bit microcontroller and it's not tied to a specific transport layer. Thus it is widely used in the embedded electronics IoT world.
The MQTT protocol defines how the actual data is packed into bytes. How these bytes are communicated (via TCP, via HTTP, via ethernet or via a simplistic radio link) is not predefined. But for most of the embedded hardware IoT devices, this will be most likely a simple TCP connection via WiFi or ethernet. So we will continue with MQTT over simple TCP.
How to connect MQTT to SCP?
So let's check how these sensors can be connected to the SAP Cloud Platform (SCP). First of all, the sensors need an external MQTT broker where they publish their sensor readings and the MMS can subscribe to. There are a lot of commercial services out there, like HiveMQ, or you can host your own with help of the open source MQTT broker Mosquitto.
Second, you need the SCP. Open the SCP Cockpit by opening https://account.hana.ondemand.com/cockpit or https://account.hanatrial.ondemand.com/cockpit (if you're using the free trial account). Find the IoT Service in the menu "Services" by searching for it.
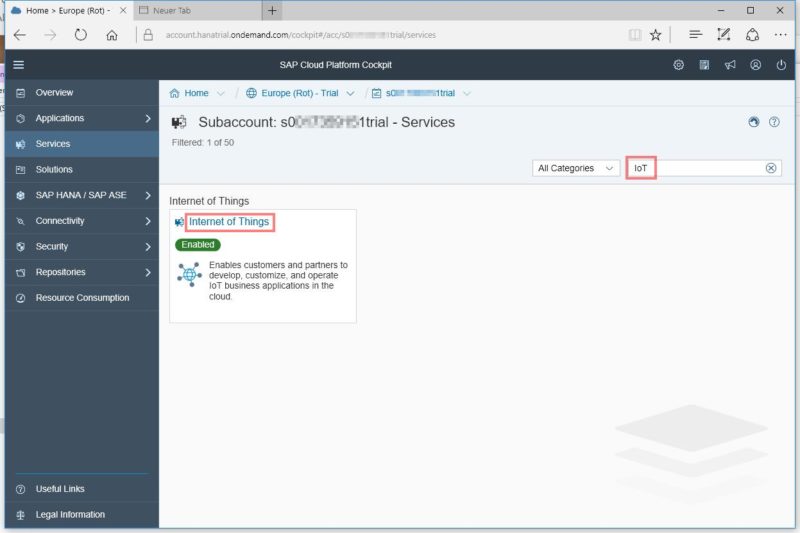
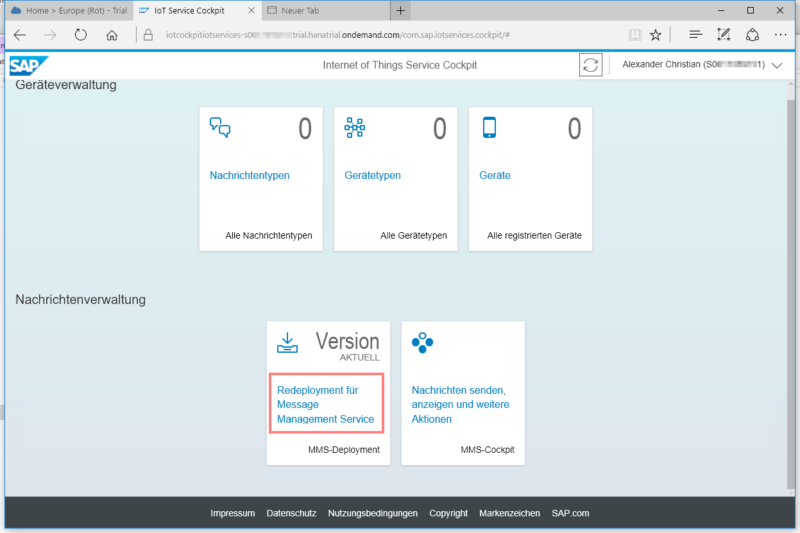
If it's not already enabled, open it and click on "Enable". This might take a few moments. After that, click "Go to Service" to open the IoT Service Cockpit. In the cockpit you'll find several tiles. One of them is named "Deploy Message Management Service". If it is already deployed, redeploy to ensure the latest version, as this version may change over time. Note that deploying, like enabling the service, may take some time.
Back in SCP Cockpit, go to Applications → Java Applications and check the start of your MMS application:
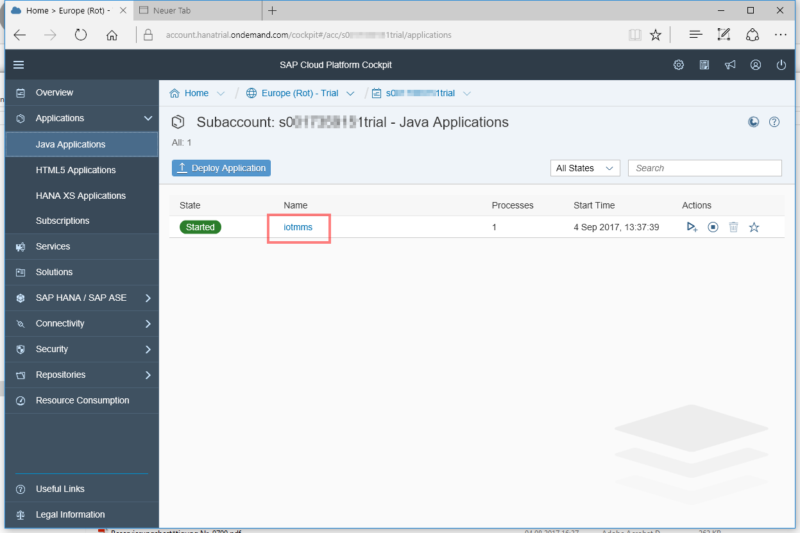
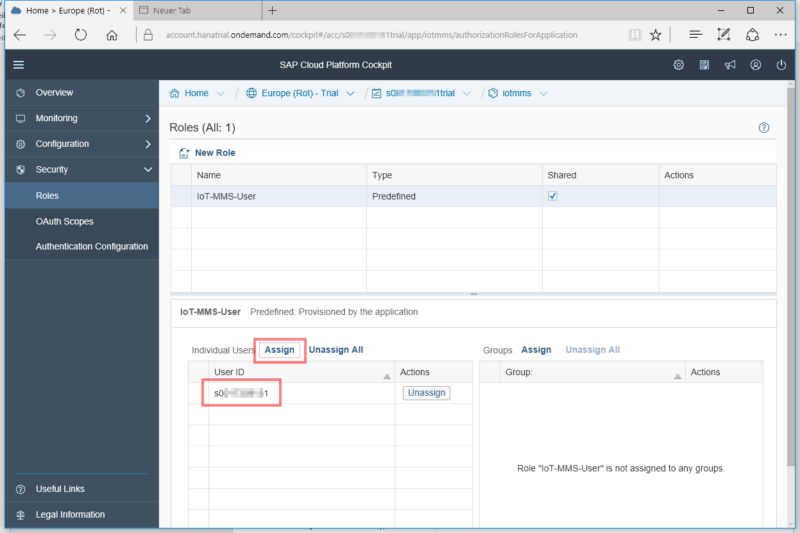
Once it's started, click it to see further details. Before we actually use it, you need to assign your user-account to the IoT-MMS-user role. Click Security → Roles and assign your SCP user as shown below:
Back in the IoT Service Cockpit you need to define
- Message Types
- Device Types
- Devices
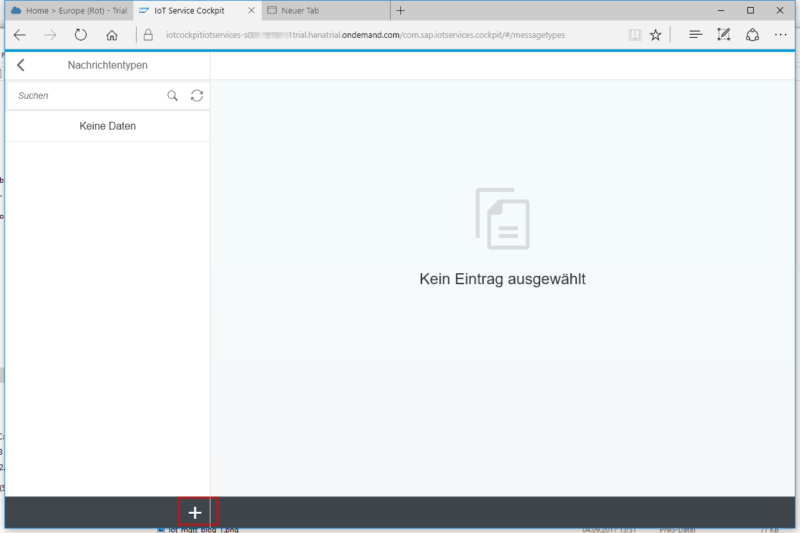
So click the tile "Messages Types". Use the "+" symbol on the bottom of the left column, to add new message types:
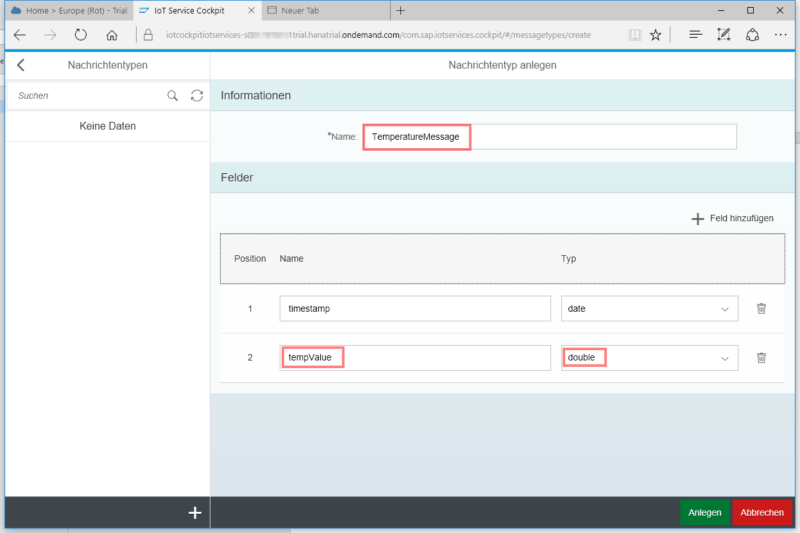
Enter a name for the message type, e.g."TemperatureMessage". You will find that here one predefined field called "timestamp" already is set. It's always a good idea to have a timestamp for those kind of messages So just leave this field and add another one for your temperature value as shown below. Click the green "create" button and you're done with the message type.
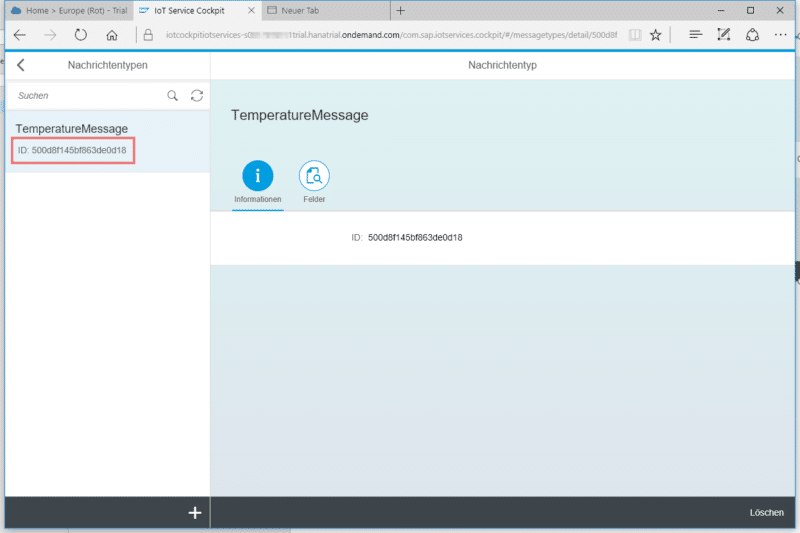
The list of message types also shows an ID for the each type. This will be important later on when actually sending messages from the device. So note down or copy & paste:
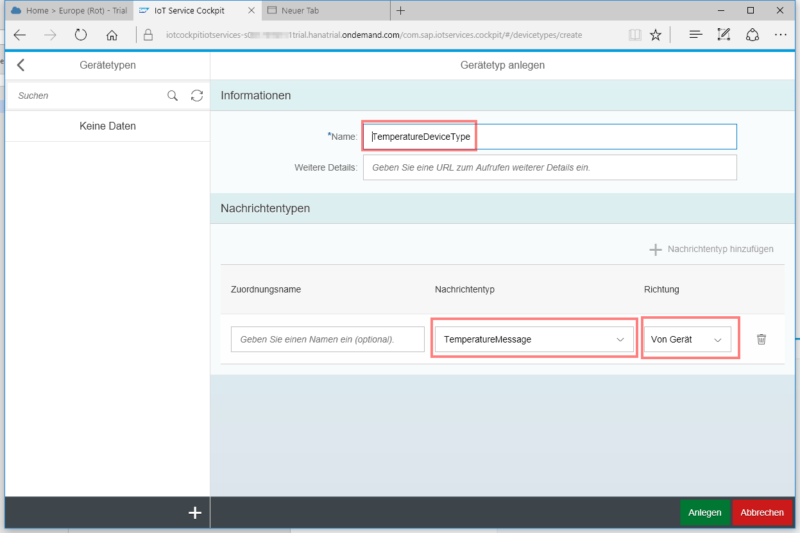
Back in the IoT Cockpit main page, go to the tile for device types. Here you also click the "+" symbol like you did before to add the message type and add a new device type. The device type needs a name and you have to assign message types. So again click the "+" symbol, choosing the message type that you just created. Then set the direction to "from device" and click the green "create" button to save the new device type.
Now, the final tile, called "Devices". Add a new one using the "+" symbol again, and set a name for the device. Take care you choose the right device type for this new device:
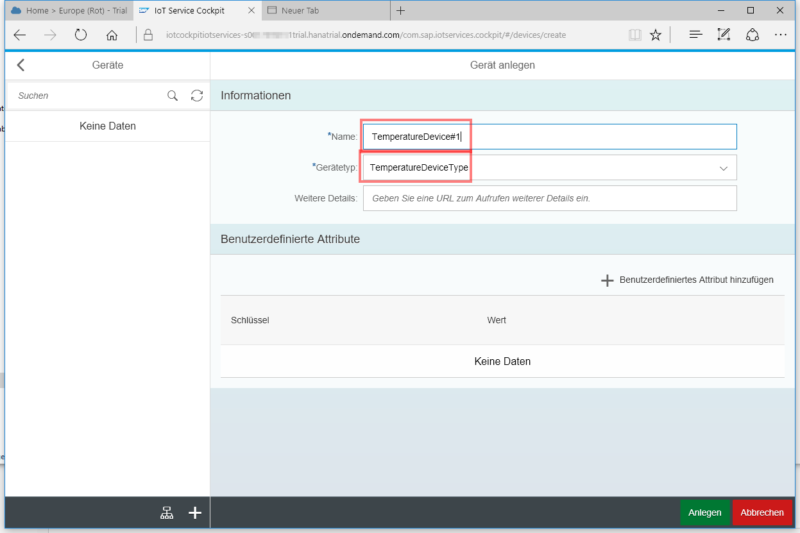
Like with the message type, the device also gets an ID. This will be important later on as well. Thus note down or copy&paste for later reference.
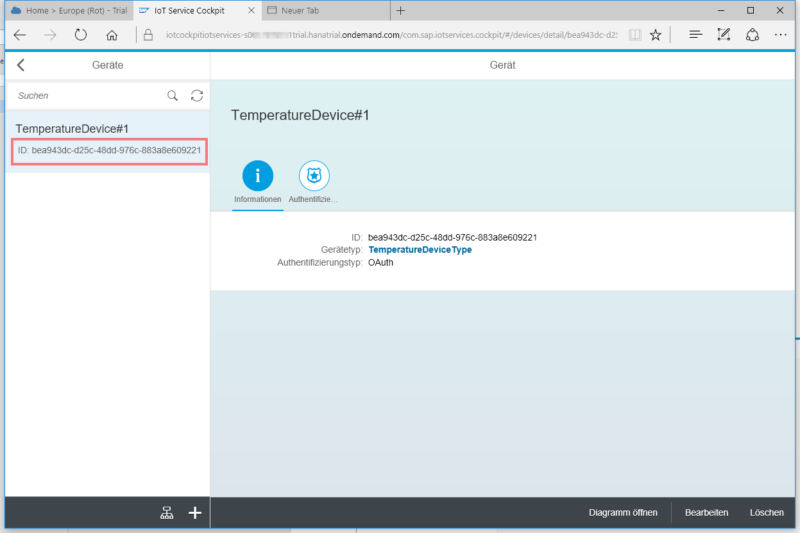
That's all so far for the device. This way, you can setup as many devices and message types as you require. Next part is the connection of the IoT Service to the MQTT broker. To start find the tile called "MMS Cockpit" in your IoT Service Cockpit:
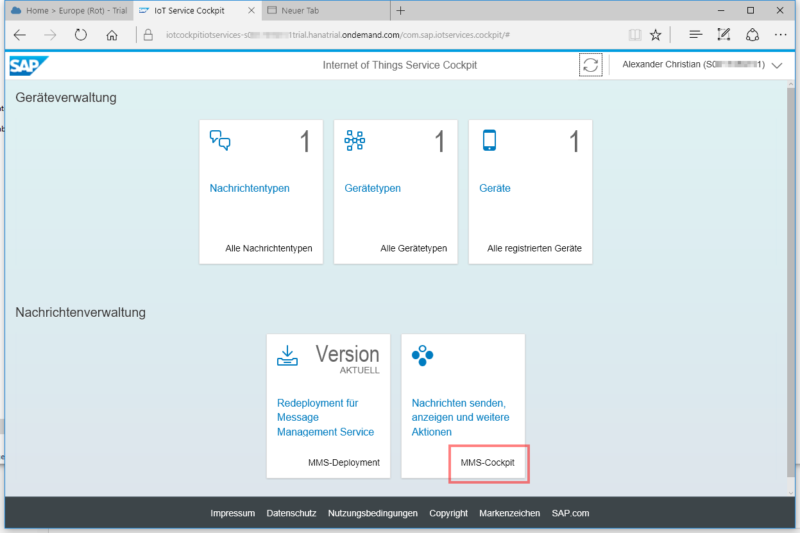
Click it to open the MMS-Cockpit. You now need to configure the MMS and set a MQTT Broker. Click the configuration tile:
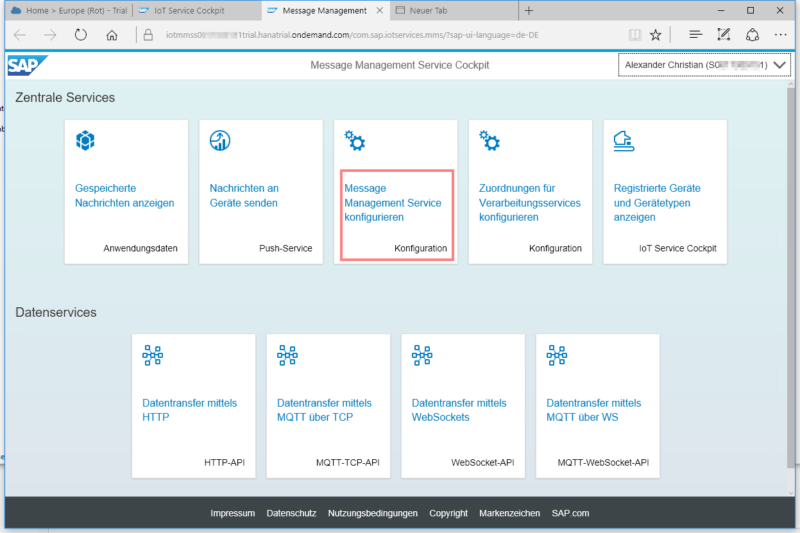
The configuration opens with a big list of items. Scroll down to "mms.mqtt.broker_url":
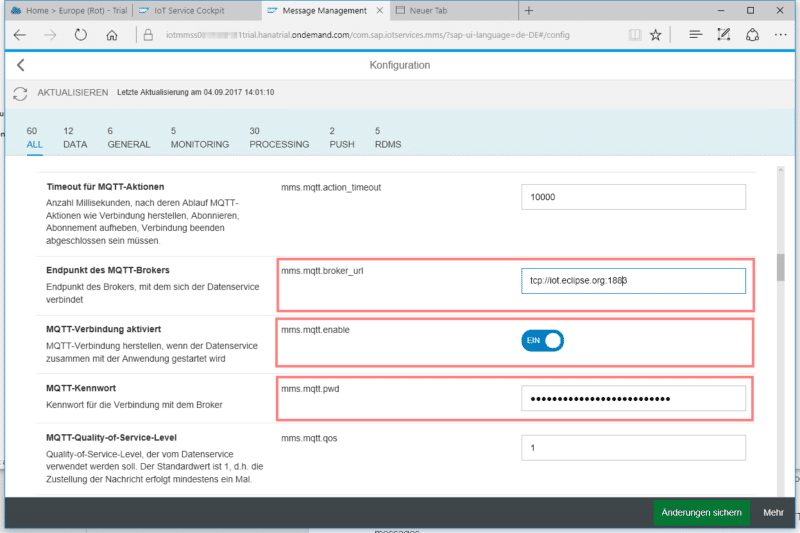
Enter the TCP-URL for your MQTT broker, enable the MQTT support and do not forget to specify your password and username (username is somewhere below in the list and is not shown in the screenshot). Save your changes clicking the green button on the bottom right. Your IoT Service is now connected to your MQTT broker and will listen for relevant MQTT messages.
Note that the IoT Service expects a special format of MQTT messages. It's written down in JSON format and looks like this:
{

 "mode":"async",

 "messageType":"9c1976ec272aca13bc84",

 "messages":[{"tempValue":"123.45","timestamp":"631148400"}]

 }
The element "messageType" references the ID of your created message type. The element "messages" contains an array of messages, matching your message type.
The IoT device needs to fill in the "tempValue" as well as the „timestamp“ (here: unixtime). Then publishes the message to the topic
iot/data/iotmmss0xxxxxxxx1trial/v1/fc594c4f-51fd-4ecd-9770-a864d087dec5
The first highlighted part must match your accountname, typically starting with "s" and ends with "trial" if you're on the trial instance of SAP Cloud Platform. The second highlighted part must match you device id.
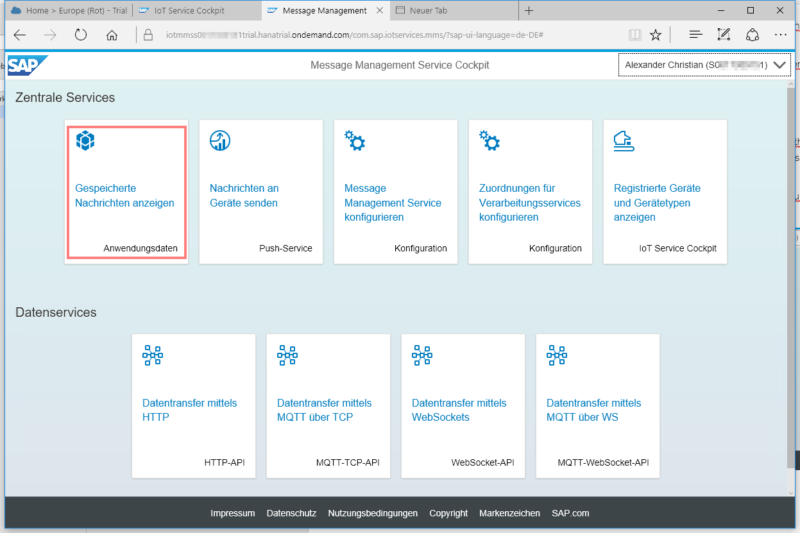
As soon as your device starts sending messages/data, you can watch the incoming data on your MMS cockpit using the tile "View stored messages":
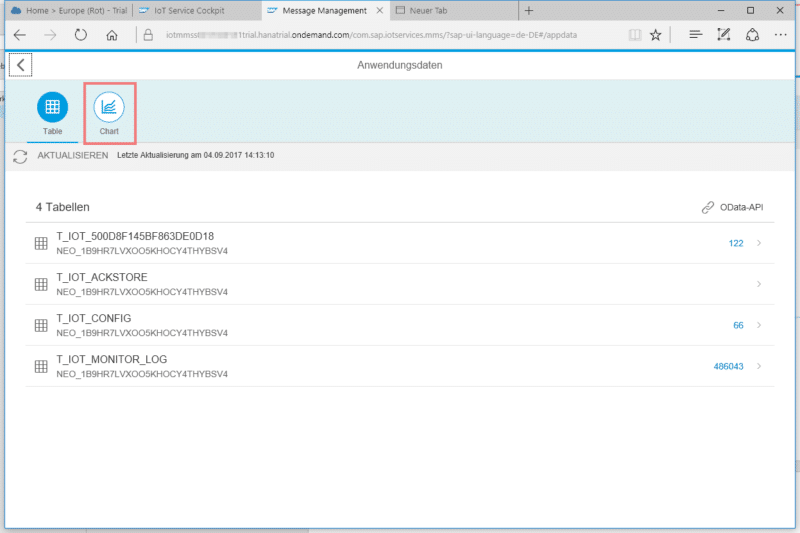
Once opened, click the chart symbol ...
... and select your device as well as the message type:
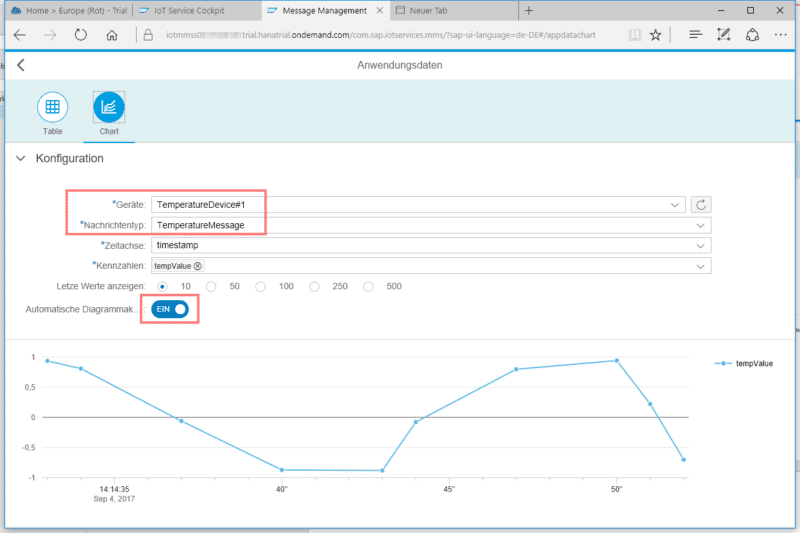
Enable data updates by switching the marked button to "on" and finally there it is: real live data from an IoT device, somewhere in the world, measuring health data of your pipeline infrastructure.
Using SAP Smart Data Streaming you are able to filter and analyze the incoming data to focus on unusual patterns. This will help you to keep your system up and running 24x7 and thus your business competitive. Because now you are able to exactly tell what happens and where it happens before a major breakdown occurs.
MQTT is just one possibility. You can achive the same with other protocols such as HTTP, Websockets or MQTT over Websockets.
Next steps
Of course it doesn't have to end here: Smart Data Streaming not just observes the data, it could for example trigger alarms if the data exceed certain limits. Or think about a combination with machine learning ...


